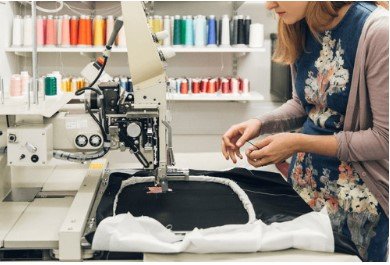
When it comes to machine embroidery, your design is only as good as the foundation it’s stitched on. Enter a guide to embroidery stabilizers the unsung heroes that keep your fabric from puckering, your stitches from shifting, and your entire design looking crisp and professional.
If you’ve ever wondered why your embroidery looks sloppy or distorted even when you use the right threads and machines, chances are your stabilizer game needs an upgrade. This guide breaks down everything you need to know about embroidery stabilizers—types, uses, and how to choose the right one for flawless stitching results.
And if you’re also looking for stitch-ready embroidery files, Digitizing Buddy offers top-tier custom digitizing services that work hand-in-hand with proper stabilizing techniques for perfect outcomes every time.
What is an Embroidery Stabilizer?
A stabilizer is a piece of nonwoven material placed underneath or on top of fabric to support embroidery stitches during and after the sewing process. It prevents:
- Fabric stretching
- Design distortion
- Puckering and wrinkling
Stabilizers act as the scaffolding your embroidery design needs to come out clean, balanced, and accurate—no matter the fabric type.
Types of Embroidery Stabilizers
1. Cut-Away Stabilizers
Cut-away stabilizers are permanent. After stitching, you trim the excess away, but the stabilizer remains under the stitches.
Best for:
- Stretchy fabrics like knits or jerseys
- Designs with high stitch density
Pros:
- Long-term stability
- Excellent support during repeated washes
Tip: Always cut as close to the stitches as possible without snipping the thread.
2. Tear-Away Stabilizers
Tear-away stabilizers are temporary. You tear off the excess after embroidery, making them ideal for light or simple designs.
Best for:
- Woven fabrics like cotton or denim
- Low-stitch designs or monograms
Pros:
- Fast and clean removal
- Great for time-sensitive projects
Cons:
- Not ideal for stretchy materials or dense stitch areas
3. Water-Soluble Stabilizers (WSS)
These stabilizers dissolve in water, leaving no trace behind.
Best for:
- Free-standing lace (FSL)
- Sheer fabrics like tulle or organza
- Top-layer support on towels or fleece
Types:
- Film (for top use)
- Mesh (for hoop or base use)
Tip: Rinse thoroughly to avoid sticky residue.
4. Heat-Away Stabilizers
These evaporate under heat from an iron and are ideal for delicate fabrics or items that shouldn’t be washed.
Best for:
- Velvet
- Silk
- Organza
Use with caution—always test on a scrap before applying heat to your main project.
How to Choose the Right Stabilizer
Choosing the correct stabilizer depends on several factors:
| Fabric Type | Stabilizer Recommendation |
| Knit/stretchy fabrics | Cut-away |
| Woven fabrics | Tear-away |
| Sheer or lace | Water-soluble |
| High pile (towels) | Water-soluble topper + base stabilizer |
| Lightweight fabrics | Light cut-away or tear-away |
| Heavy/dense designs | Strong cut-away |
Pro Tips for Using Embroidery Stabilizers
- Always hoop the stabilizer with the fabric for best results.
- Don’t reuse tear-away or cut-away stabilizers—fresh ones ensure stability.
- For delicate items, float the fabric by hooping only the stabilizer and securing the fabric with spray adhesive or pins.
- Double up stabilizers for extra support on dense designs.
- Use a water-soluble topper on fleece, towels, or knits to prevent stitches from sinking into the fabric.
Stabilizer Terms You Should Know
| Term | Meaning |
| Hooping | Placing the fabric and stabilizer into an embroidery hoop |
| Floating | Hooping only the stabilizer and attaching fabric with tape, pins, or adhesive |
| Topping | Using a stabilizer layer on top of fabric (usually water-soluble) |
| Backing | The stabilizer underneath the fabric that supports stitches |
Embroidery Stabilizer Combinations
Sometimes, one stabilizer isn’t enough. Here are common combos:
- Cut-away + Water-soluble topper – Great for knits or baby clothes
- Tear-away + Water-soluble – Ideal for towels and high-pile fabrics
- Double cut-away – Use for ultra-dense logos or jacket backs
Common Stabilizer Mistakes to Avoid
| Mistake | Result | Fix |
| Using tear-away on knits | Puckering | Use cut-away instead |
| Skipping stabilizer entirely | Distorted designs | Always use appropriate backing |
| Not matching stabilizer weight to fabric | Poor support | Choose stabilizer weight close to fabric weight |
| Rehooping stabilizer after stitching | Misalignment | Start with fresh stabilizer every time |
Where to Buy Embroidery Stabilizers
You can find stabilizers at:
- Online embroidery suppliers (e.g., Madeira, Sulky, Floriani)
- Craft stores (Joann, Michaels)
- Machine dealerships
- Wholesale distributors for bulk savings
Pro tip: Buy in pre-cut sheets for faster hooping or rolls for larger projects.
Digitizing & Stabilizer: A Perfect Match
Even the best stabilizer can’t save a poorly digitized file. That’s why using a professional digitizing service like Digitizing Buddy ensures your designs are:
- Optimized for the right stitch density
- Balanced for the fabric you’re using
- Structured for minimal thread breaks and puckering
Their experts deliver machine-ready embroidery files in all major formats (PES, DST, JEF, VP3, etc.) saving you time, thread, and headaches.
Final Thoughts
Embroidery stabilizers are absolutely essential for quality embroidery results. Whether you’re stitching on stretchy T-shirts, fluffy towels, or sheer organza, using the right type of stabilizer makes the difference between sloppy and stunning.
Remember: stitch success starts at the base. Pair the right stabilizer with the right digitized design, and you’re halfway to embroidery excellence.
For professional digitizing services that complement your stabilizing setup, check out Digitizing Buddy—because your design deserves the best foundation and flawless stitching from the very first hoop.